
22 May 2016

Making small changes
 |
| https://behapy.s3.amazonaws.com/36/45/153645/preview.png |
- Collaboration
- Creativity
- Cognitive Flexibility
I was encouraged to start by making a SMALL change and so I started with the most simple of my three space drivers, collaboration.
Previously my classroom was arranged in groups of 4 or 5. I have 22 desks in my classroom, so that is 2 groups of 4 in the "front" of my classroom, 1 group of 4 in the middle, and 2 table groups of 5 desks each at the back of my classroom. And this is how my classroom was permanently arranged.
Although there are 22 desks in my classroom, I don't have a class with more than 21 students in it. So typically my students work in groups of 3. When it's time for group work, I usually post the groups up on the board, and then students find their partners, and move around the room finding a space to work. Some groups of 3 sit at a table of desks. Sometimes students move the desks around. Some students work on the floor, or the stand at the lab counters in the back, or work out in the hallway. It gets a little messy, and it's a little chaotic, but I've always been fine with that.


Until now. For this course, I challenged myself to think about how collaboration is done in my classroom, and what role the physical space plays in the collaboration of my students.
It is SUCH a simple change to make ... it's almost embarrassing that I haven't thought of it sooner. I changed my table groups to be arranged in groups of 3 (as I typically group my students) and now each group has their own space at a table. That makes it a lot easier for them to work effectively and efficiently during the class period. It also gave me more space to spread the table groups out and there is more room for me to walk between them and circulate throughout the classroom.


Separating into groups is much more efficient, and because groups have an appropriate table space, they can work more effectively. This is a good example of making a small change to make a big difference!!
Now .... what else can I do???
Space Drivers
What is a Space Driver?
A Space Driver is a learning behavior that you can use the classroom to teach. A "simple" example is flexible seating. You can use flexible seating in your classroom to teach the students to work with others, to be flexible, to collaborate, etc. Space Drivers are used to link design changes with skill development. The space that you create in your classroom (if you are redesigning it) supports the skills you have identified.
Here are my reflections on some of the Space Drivers we have learned about in this class:
COLLABORATION

CREATIVITY

STUDENT CENTERED

EXPLORATION

COGNITIVE FLEXIBILITY

Student Input
One of the ideas I like best from this course on Redesigning the Classroom is the idea of asking for student input. Why not??
I asked my students two questions ...
"What kind of space would help you learn?" and "WHY would that space help you learn?".
This is what they told me ....

It is mildly hilarious that the word "HELP" appeared so many times and is just HUGE in this image ... but they repeatedly said that they wanted a space in the classroom where they could to to get help when they needed it. So that might (hopefully) be different from what you were originally thinking ... ha ha ha --- that my students are asking for HELP!!!
08 May 2016
Portfolios for Assessment
Have I mentioned my incredible teaching partner and team that I work with before? They are truly amazing! We have been on the forefront of implementing digital portfolios at our school. It hasn’t always been an easy road, but to our credit, we have always had a purpose for our portfolio’s driving decisions and policies at our school, and that was reflection. That was always the primary purpose
Having said that, I learned a ton from Holly Clark during our google hangout. Here are my biggest takeaways from her session.
REFLECTION
 Reflection is the most important part of the portfolio. She talks about the difference between a process portfolio (highlighting the steps taken), a showcase portfolio (highlighting the final product) and the best option … the hybrid portfolio, where reflection is at the core.
 One of the ways I think she simplifies the reflective process is by suggesting that students use Google Drive to collect all of the work they could put into their portfolio and the use screencastify to have students make a video reflection while going through their digital work.
By reflecting on their work in this way, we can get much richer and detailed assessment from students, and see their own thinking about their process and growth.
VISIBLE THINKING
Holly jokingly (?) wants to rename digital portfolio’s as “visible thinking portfolios” and I love that.
The idea that a students portfolio visualizes their thinking and development of ideas makes it much easier for us teachers to assess how they are understanding and growing in their learning.Holly talks about how a reflective portfolio is a tool that can be used to get inside a students brain, to see what they are thinking.
 |
| http://kimmia.com/demo/wp-content/uploads/2013/08/portfolio-5.jpg |
DIGITAL FOOTPRINT
I teach 6th grade, so my students are 11 and 12 years old. What is the proper age for students to publish their work online?
Holly says 4th grade. She talks a lot about digital citizenship and how teachers need to give students opportunities to practice positive digital citizenship since they might not be doing that in their personal social media lives.
PORTFOLIO TEMPLATES
Holly suggests giving the students a template for their blogs to reign in their creative tendencies, arguing that there is a time and place for creativity but that a digital portfolio is not it. By providing templates, students will have a more polished and professional looking portfolio that they can feel proud of. And when they are older, they can begin designing their own website.
I loved all of her ideas about portfolio’s and she’s really pushed my thinking about how I can better use my students portfolio’s for learning and also for assessment. One question I had was how to take a student’s rich reflective video and document their learning based on the video in a report card and grade book. I’m guessing these things are counter productive to one another but it is also the reality of many teachers who are restricted by grading and reporting policies. So I’d love to hear from others who are using reflective portfolios as assessment. Comment below or send me a message @laurenteather!
Using technology to make assessment better
 |
| https://plus.google.com/+SylviaDuckworth/posts/E8TDXUAo4jE |
This course on assessment has really pushed my thinking about assessment, in a good way. I was really challenged to look closely at the SAMR and think about how I have been using technology to “improve” my assessment.
My professional goal this year was to be accountable for differentiation that would successfully move all of my students along the continuum of learning. So I experimented with different ways of assessing student understanding and using instructional strategies to remediate and extend different groups of students. Needless to say, the paperwork quickly became overwhelming!
I started with a very cool differentiation worksheet that looked like this:

It gave me a good start to tracking differentiation, but eventually I had so many different versions of this sheet for a single learning objective as it got updated and kids shifted back and forth from different columns, I quickly became buried in papers. It didn’t take me long to start experimenting with digital tools for assessment. One of my favorites is the combination of Doctopus & Goobric. Doctopus is a way of electronically distributing digital worksheets to your class (making you the owner of all docs) and Goobric is the add-on that enables you to assess those documents using a rubric. Watch this video by the incredible Jennie Migiera for more information.
Once you have installed the add-on, it really does walk you through the steps one at a time. It’s pretty simple and you’ll get the hang of it in no time! I promise!
Assessment and feedback go hand in hand and I have two new (to me) tools that make that not only possibly digitally, but quick and easy too!
Formative is an awesome digital assessment tool that can be used to give traditional types of digital assessments, but it also has a white board tool which is perfect for open ended math questions, or for adding elements of visual literacy into your assessments.
 |
| This is the white board tool, you can see everyone responses as they are being drawn. You can project this too and the app give you an option to remove student names for projection. |
 |
| This is where you can score the work and send feedback to the student. |
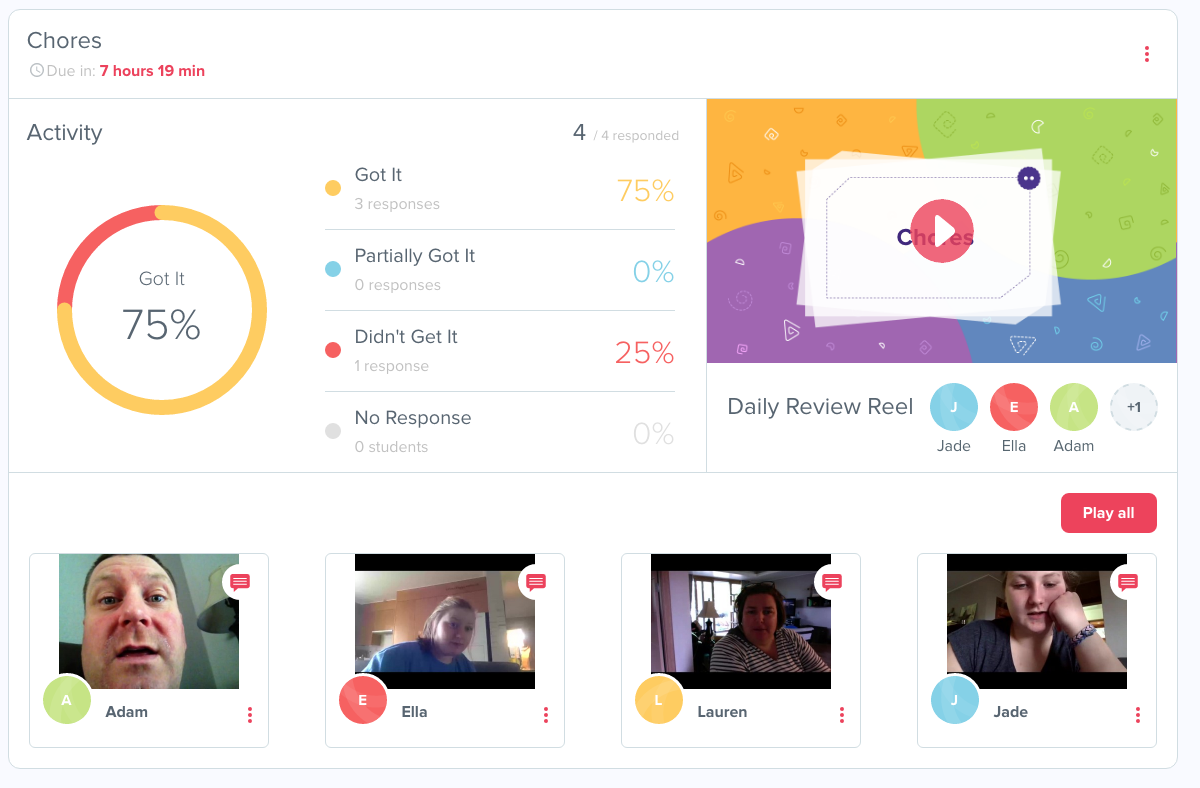 |
| This is the teacher overview. The self-assessment option gives you the "got it" "partially got it", etc feedback. |
These types of digital tools for assessment not only make grading student work quicker and easier, but the results that are collected from these assessments makes it very easy to tell me:

And so much more. I think students really like getting the individualized feedback and my goal, of being accountable for differentiating and moving all students along, can be met! I have a struggling student, who I almost always have to give remediation to after these types of assessments. He actually came to me after school one day for extra help and thanked me for helping him. He said that he felt like other teachers expected him to get the extra help on his own.
- Which concepts I need to teach again to the whole class
- Which students are ready for enrichment
- Which students need more practice
- Which students need to come after school for extra help
And so much more. I think students really like getting the individualized feedback and my goal, of being accountable for differentiating and moving all students along, can be met! I have a struggling student, who I almost always have to give remediation to after these types of assessments. He actually came to me after school one day for extra help and thanked me for helping him. He said that he felt like other teachers expected him to get the extra help on his own.
Sigh .... Assessment!

Assessment is a topic that I have always found uncomfortable. My assessments and my grading practice have been heavily critiqued by parents, and heck -- by students too. I guess that's one reason it makes me feel uncomfortable. It seems like my assessments are never good enough. Designing a tool to measure a students growth is very difficult when different parties have varying ideas of what that growth should look like. And I think that’s another reason I feel uncomfortable about assessments. I’m always questioning my own ideas -- Am I looking at this the right way? Am I being too hard on the students? Am I being too easy? Whatever the reason -- assessment happens.
I have really enjoyed digging into assessment during this course and trying and learning new things and ideas. My learning has caused me to question and clarify my own understanding and purpose for assessment in the classroom. I have a really wonderful teaching partner (and team!) who always engages in these types of conversations with me. We have gone around and around on the topic of assessment over the years.

I have really enjoyed digging into assessment during this course and trying and learning new things and ideas. My learning has caused me to question and clarify my own understanding and purpose for assessment in the classroom. I have a really wonderful teaching partner (and team!) who always engages in these types of conversations with me. We have gone around and around on the topic of assessment over the years.
- How do we vary assessments? It seems like written and oral are the primary ways students communicate their understanding.
- How do we differentiate assessments? DO we differentiate assessments?
- How do we assess individual learning that happened during a collaborative group project?
- Do individual assessments always have to be done in a closed environment (no talking, student works alone)
- How do we prepare students for assessments?
- Should we give re-do's? How do we give re-do's? Who gets to take a re-do? How many times can a student re-do?
- What kind of feedback should we give on assessments?
- How much should the assessments count for?

When I try to think about the role of assessments in “real-life” I immediately think of things like college exams, driving tests, standardized testing, etc. But what about the life the rest of us live in? The best teachers in my school, they are the ones who collaborate well with others, take and share ideas with others, build off of the ideas of others, and work side by side with others, and continually reflect, evaluate and improve upon their own work. This is how I expect my students to learn in my classroom. Knowledge, understanding and skills are developed through collaboration. But when it comes time for assessment, I expect students to do it alone.
Teachers who close their classroom doors to isolate themselves from the rest of the faculty, and use their own ideas over and over and over again are not using best practice. These types of teachers are often described as “traditional” and “old fashioned”. And I think we all know these are not typically our best teachers. But I think this is what we ask students to do in testing conditions. Is it realistic to expect students not to get help and be resourceful on assessments? We work hard to ask questions that are not “google-able” and encourage students to do ample research and use varied resources to formulate responses.
What if students who did the best on the assessments were the ones who were the most resourceful, who checked their work with other students, and then reviewed, revised, edited and reflected on their work? Tests and isolated testing conditions are so artificial and don’t have any place in classrooms that strive for “authentic” assessment.
Why the Best Teachers Don't Give Tests is an excellent article discussing these very ideas.This is how I hope to change next year in my classroom. I want to stop giving tests, or at least seriously minimize their role in assigning overall performance measures, and assessing students skills to be resourceful and to create a dynamic product, work effectively in a team, think creatively, etc. I would love to hear from any of you who are already doing this or have good suggestions or resources to make it happen!
05 May 2016
Digital Assessment with Google Forms
During this course on assessment we have been bombarded with so many different options for digital assessment. I kind of have a core set of apps that I use on a regular basis, but I'm always open to trying new things. Unfortunately, I'm not very good at giving something a second chance after I've ruled it "unfit" for my classroom. This is what happened with Google Forms.
Yeah --- I've tried giving quizzes using google forms, and when Flubaroo came out and blew up the teacher web I tried that too, but it didn't work for me, I didn't like the quizzes I was writing. Because ...
 I felt that using Google Forms meant asking multiple choice questions or fill in the blanks and that really limited the type of understanding I was able to assess using this tool.
So I wanted to try a new add-on for this assignment. I chose SuperQuiz. And my assessment .... it's super cool! SuperQuiz has a ton of really cool features that make it different from other add-ons. Like other add-ons, it creates a series of tabs which will analyze the data in your spreadsheet in different ways. My favorite tab that is generated looks like this:

I know the tab looks a little confusing, and slightly overwhelming, but in my opinion, this is where the magic of SuperQuiz happens. This is where you can personalize the feedback that you are giving to students based on their responses to the quiz. If you are able to design an appropriate assessment, this automation of personalized feedback could save teachers so much time, and really be meaningful for students.
The only area for improvement of this add-on is that it's a little bulky. I like how the varying analytics are separated out into tabs, that helps, but like any other add-on, it takes some time to get what you want out of it. SuperQuiz also does not have a feature to manually grade free text answers.
My final reflection on this tool is that while SuperQuiz has the function to auto-grade and give you decent analytical data from your responses, it only works for responses that are multiple choice or fill-in-the-blank. It doesn't work for free text answers. If I were to use google forms for a math assessment, I can really only see if the students are getting the correct answer. It's much more difficult to design a way to assess their thinking, the strategy they developed in their mind, their thinking, their use of multiple strategies, or how they can model mathematical situations. Even their use of mathematical vocabulary cannot really be assessed using google forms.

I know there are some of you out there who have used google forms in ways that I can only imagine, and some of you who are masters at assessing student understanding with multiple choice questions ... I would love to hear from you. Give me some examples, something to read. I would love to learn to be better at this!!
Yeah --- I've tried giving quizzes using google forms, and when Flubaroo came out and blew up the teacher web I tried that too, but it didn't work for me, I didn't like the quizzes I was writing. Because ...

So I wanted to try a new add-on for this assignment. I chose SuperQuiz. And my assessment .... it's super cool! SuperQuiz has a ton of really cool features that make it different from other add-ons. Like other add-ons, it creates a series of tabs which will analyze the data in your spreadsheet in different ways. My favorite tab that is generated looks like this:

I know the tab looks a little confusing, and slightly overwhelming, but in my opinion, this is where the magic of SuperQuiz happens. This is where you can personalize the feedback that you are giving to students based on their responses to the quiz. If you are able to design an appropriate assessment, this automation of personalized feedback could save teachers so much time, and really be meaningful for students.
The only area for improvement of this add-on is that it's a little bulky. I like how the varying analytics are separated out into tabs, that helps, but like any other add-on, it takes some time to get what you want out of it. SuperQuiz also does not have a feature to manually grade free text answers.
My final reflection on this tool is that while SuperQuiz has the function to auto-grade and give you decent analytical data from your responses, it only works for responses that are multiple choice or fill-in-the-blank. It doesn't work for free text answers. If I were to use google forms for a math assessment, I can really only see if the students are getting the correct answer. It's much more difficult to design a way to assess their thinking, the strategy they developed in their mind, their thinking, their use of multiple strategies, or how they can model mathematical situations. Even their use of mathematical vocabulary cannot really be assessed using google forms.

I know there are some of you out there who have used google forms in ways that I can only imagine, and some of you who are masters at assessing student understanding with multiple choice questions ... I would love to hear from you. Give me some examples, something to read. I would love to learn to be better at this!!
24 April 2016
Visual Literacy in Mathematics
Have you ever seen mathematical images like this?
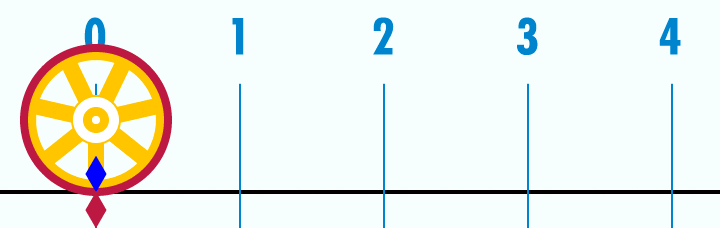
This image gives a visual explanation as to why pi is 3.14 - you see how the circumference of the circle is 3.14 time the radius. It's very clear. Where were educational images like this when I was growing up?


Matthew Peterson discusses the idea of teaching mathematics without words in his Ted Talk (below). He does a very good job of showing (visually) how much teachers rely on words for teaching. Growing up with dyslexia, words gave him nothing but problems, and then he read about Albert Einsteins struggle with dyslexia. Albert said this:

Wow ... one of the greatest mathematical minds of all time talks about the importance of visual literacy in his own understanding. That's really powerful, especially to learners who do struggle with words.
As a visual learner myself, I have long been interested in how to teach mathematics visually in order to build conceptual understanding. At my school we use the Singapore Math pedagogy to teach mathematics K-8. Central to this model is the Concrete - Pictorial - Abstract approach, which is really the opposite of traditional math education. In Singapore Math we start out by making math concrete, with manipulatives, examples, puzzles, real-world problems. Then we introduce the pictorial approach by using pictures, images, and models. The last step (as opposed to the first) is to introduce the abstract - the computation, the algorithms, etc.
 |
| http://kateshomeschoolmath.com/singapore-math-buying-guide/ |
So this is my final project for this course on Visual Literacy. This is how I made learning how to balance algebraic equations visual. I found a great website with visual puzzles that really reinforce the concept of balance, which is the central concept of this unit. Students start out visualizing the balance of the mobiles by doing math in their heads. After they have done a few puzzles, then I ask them to connect what they are doing visually to what they have already learned about algebraic expressions, by writing an equation. Then, by reflecting on the math they were doing in their heads, they can articulate how they are using inverse operations to solve the equations. See my lesson below and the accompanying video underneath it. I would love to connect with any other mathematics teachers who are also working on using visual mathematics to teach.
albert einstein image from Michael Wohlwent at the Noun Project
Slow Looking
As part of my learning in this course this video talk by Brian Kennedy stood out to me:
He introduces this method for slow looking @8:52.

As a science teacher I'm constantly asking my students to make observations. Often, I find that they look, see and sometimes describe, but rarely get past that point on their own. This is a nice natural progression to encourage students to observe the world around them more carefully, and to analyze it and make meaning from it, to better understand the world around them. It would make a nice poster on the wall to remind and encourage students to go further.
This carries over into mathematics as well. Often times it takes much more than looking, seeing and describing in order to solve complex and challenging math problems. But when students can create visual representation of problems, using models and such, then they can see and describe AND analyze and interpret.

Visual Literacy
The next course is one on visual literacy. I've always felt like I had a lot of experience in this area since I, myself, am a visual learner. I am no artist, but I have spent many years doing digital scrapbooking for my family. This meant that I learned to use photoshop, I learned about design, and most importantly, I learned how to use design and visual cues to communicate a message.


Awww... my kids were so young back then!! It's fun to go back and look at those old photos!
Applying the principles of design to my teaching is not at all a stretch. I find that I use my skills quite often when designing presentations, making worksheets, organizing meetings, and even planning after school activities. But it wasn't until recently that I made the connection that

That was a profound learning for me. And my own own visual literacy skills turned more into modeling rather than using them for practical purposes. The intentionality of teaching students to use resources like Canva, the Noun Project, Google Slides, iMovie, Piktochart, PicMonkey and so many more, is now woven into my lessons throughout the year. Whether the students are taking notes, making a movie, creating a presentation or working on any project, there is always an opportunity for them to connect their verbal understanding to something visual.
10 April 2016
Flipped it!
Here are the two flipped lessons I created for my final project for this course.
#1: Writing Algebraic Expressions
This one was a real joy to create because I got to play around with EDpuzzle, which you may know, I am in love with! I also got to sift through Dan Meyers 3 act lessons, which is always fun. So much creativity there -- if you are a math teacher, make sure you bookmark that spreadsheet and refer to it often!
#2 Representing Independent and Dependent Variables
This lesson gave me A LOT more frustration - because I tried to be all fancy and "try new things".... curses!!!! I tried the app Lensoo Create for my ipad, to make my own flipped video. The app took some getting used to. I couldn't figure out how to delete slides, and when I tried to clip some of the audio, I lost the entire video. THE. ENTIRE. THING!!! Not even my slides remained . . . nothing. So I had to start all over from the beginning (drawing all those graphs!!!) and I can't begin to tell you how frustrating that was for me. Once I finished the video in Lensoo, it took some time to process and upload the video to youtube, and I was a little impatient while waiting for that. In the mean time, I tried another new tool -- Blendspace, to pull together the element of the lesson I created. Let me just say that I was already so frustrated from the Lensoo ordeal, that the fact that the URL is NOT www.blendspace.com really aggravated me. The URL is https://www.tes.com/lessons. ???? What the heck? Why? This just started things off on the wrong foot for me. I started building my lesson, which I was kind of proud of. I thought it was a pretty good lesson. And then I realized that even though I connected my google drive, I was still only able to upload microsoft word and powerpoint files.
And that is truly how I felt. WHY Blendspace? WHY????
Finally got the video loaded to youtube, downloaded my google slides as ppt files (see above!) and here is the final product:
Top 10 Reasons I Love EDpuzzle
EDpuzzle.
That's all I really need to say. Just check it out for yourself and you'll be hooked. I could end this blog post right here if I wanted to, because all you need to know is . . . EDpuzzle. OK, let me get real with you and just tell you how I really feel about EDpuzzle....

2. You can get an idea of what each student took away from the video before seeing the students the next day. From the teacher dashboard you can see how the students did on the quiz that you gave them while watching the video.
3. You can get an idea of how much the class learned from watching the video. From the teacher dashboard you can see overall class data from the quiz. If only 10% of your class got question #3 correct, you know where to start remediating the next day.
4. You can trim the video. Why ask students to watch the parts of the video that aren't relevant. Just trim them out. Now you can use an hour long video and just share the most important 5 minutes that demonstrate the learning you want your students to do!
5. You can add in questions. Active learning people!!! I love that students cannot be passive while watching the videos. You can structure your questions so that if students aren't paying attention, they won't get the questions right.
6. You can see how many times students re-watched the video. We're not ogres! If you didn't understand the first time, try again! We are patient with our learners.
7. You can add in your own commentary. Want students to hear it told a different way? Pronounced with a different accent? Want to make a connection to something you told them in class? You can! You can either add in an audio recording, or just a written comment that pops up during that part of the video.
8. You can record your own audio track to the video. Have you ever found a video that has really great graphics but it's in a language other than your own? Or maybe a video that just has great graphics. You can just record your own voice over the video and still use it as your lesson.
9. EDpuzzle integrates with Google Classroom. This feature is perfect for assigning videos to your students and tracking their data. So easy!
10. Quim. He's the founder/CEO of EDpuzzle and not only is he adorable and charming, but he's super intelligent (duh, he invented it) and best of all --- a TEACHER! No wonder his product is so good, he knows exactly where we're all coming from!
Now, normally I would stop at 10. To be honest, I didn't know I even had 10 items when I started the list. But I feel like there is a big one that I should add to this list before I go.
 What are you waiting for? Go sign up NOW!
That's all I really need to say. Just check it out for yourself and you'll be hooked. I could end this blog post right here if I wanted to, because all you need to know is . . . EDpuzzle. OK, let me get real with you and just tell you how I really feel about EDpuzzle....

Why have I never heard of EDpuzzle before? You can bet your britches I'll be shouting this one from the mountain top so that no teacher is left behind. In fact, I shared this with my colleagues during an in-house PD session and they all loved it too. And they all agreed with my question, "Why have we never known about this before?". It's that amazing. Go ahead and check it out for yourself. Here is a very short (20 second) video I made just to show my colleagues how it work (oh, did I mention the PD was in a bar? Yeah, I thought a cool bar trick would be perfect!):
So here's my top 10 list for "Why I love EDpuzzle":
1. You can know if a student actually watched the video or not. From the teacher dashboard, you can see who has watched it and who has not.2. You can get an idea of what each student took away from the video before seeing the students the next day. From the teacher dashboard you can see how the students did on the quiz that you gave them while watching the video.
3. You can get an idea of how much the class learned from watching the video. From the teacher dashboard you can see overall class data from the quiz. If only 10% of your class got question #3 correct, you know where to start remediating the next day.
4. You can trim the video. Why ask students to watch the parts of the video that aren't relevant. Just trim them out. Now you can use an hour long video and just share the most important 5 minutes that demonstrate the learning you want your students to do!
5. You can add in questions. Active learning people!!! I love that students cannot be passive while watching the videos. You can structure your questions so that if students aren't paying attention, they won't get the questions right.
6. You can see how many times students re-watched the video. We're not ogres! If you didn't understand the first time, try again! We are patient with our learners.
7. You can add in your own commentary. Want students to hear it told a different way? Pronounced with a different accent? Want to make a connection to something you told them in class? You can! You can either add in an audio recording, or just a written comment that pops up during that part of the video.
8. You can record your own audio track to the video. Have you ever found a video that has really great graphics but it's in a language other than your own? Or maybe a video that just has great graphics. You can just record your own voice over the video and still use it as your lesson.
9. EDpuzzle integrates with Google Classroom. This feature is perfect for assigning videos to your students and tracking their data. So easy!
10. Quim. He's the founder/CEO of EDpuzzle and not only is he adorable and charming, but he's super intelligent (duh, he invented it) and best of all --- a TEACHER! No wonder his product is so good, he knows exactly where we're all coming from!
Now, normally I would stop at 10. To be honest, I didn't know I even had 10 items when I started the list. But I feel like there is a big one that I should add to this list before I go.

Blended Learning
I am absolutely loving this learning course from EdTechTeamOnline! I have learned so much, and have had so many wonderful ideas validated, clarified, brought back to life, and inspire me to be a better teacher. So far, this course on Flipped Learning has been my favorite, because I used to have such a negative attitude about Flipped Learning, but now, I have seen it in an entirely different light.
Another one of the resources that was shared with us, is this one from Khan Academy about Blended Learning. It's a short little course on Blended Learning that demonstrates the role of flipped learning in each of the Blended Learning Models shown in the course.
So what is Blended Learning? Yeah - I had to ask myself that, because I kind of thought I knew that already, but I know what kind of trouble that has gotten me into before. Being the visual learner that I am I did some quick research.
If you have read my previous posts about learning about Flipped Learning here and here, you can probably guess that I basically went nuts for this graphic, because it's exactly what I've been talking about all along!! Ohhhh..... BLENDED!!! I get it now! It's like taking what I thought flipped learning was and sticking it together with what I like best (face to face learning). Voila! Blended Learning. I love it!
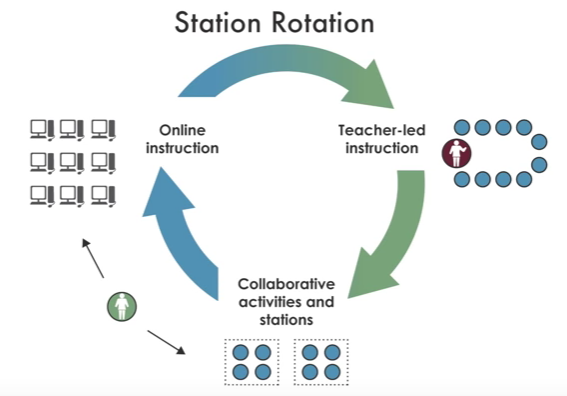
In the course above, they go through three different models of Blended Learning Classrooms:


You can click on the link to the video underneath the images to learn more about each model. One thing I love about the videos is that they offer a protagonist school that is using each model well. It's helpful to have some examples of schools that are actually using blended learning to get a better understanding of how it might look in my classroom. Of all these models I think the station model would fit into my classroom set up the best, but really, these examples served as a way for me to change my thinking about Flipped Learning. Now, I have so many different models and ways of thinking about Flipped Learning, I'm actually excited to give it a try in my classroom. You know how I just love to MIX IT UP!!!
Another one of the resources that was shared with us, is this one from Khan Academy about Blended Learning. It's a short little course on Blended Learning that demonstrates the role of flipped learning in each of the Blended Learning Models shown in the course.
 |
| http://www.careerfaqs.com.au/news/news-and-views/what-is-blended-learning |
If you have read my previous posts about learning about Flipped Learning here and here, you can probably guess that I basically went nuts for this graphic, because it's exactly what I've been talking about all along!! Ohhhh..... BLENDED!!! I get it now! It's like taking what I thought flipped learning was and sticking it together with what I like best (face to face learning). Voila! Blended Learning. I love it!
In the course above, they go through three different models of Blended Learning Classrooms:


 |
| http://latam-founders.com/community/ |
The Flipped Classroom Model
One of the resources shared for this course on Flipped Learning describes a "Flipped Classroom Model". This really helped develop my new thinking about Flipped Learning. As I have previously mentioned, I narrowly looked at flipped learning as using lecture videos for homework (HA! Laughing at my much more *sophisticated* self now!). The Flipped Classroom Model looks at a larger framework, where video's and such are only part of the cycle of learning. This might seem obvious to others, but it was new learning for me. Important learning!
Please go to the actual article, because they actually have a much better, way more interesting graphic, but this is just me, putting it into my words, making it mean something to me ... and then of course sharing it with you!

It's during the LEARN phase of this model that flipped learning can make learning not only independent but also differentiated. Imagine this was a project based learning classroom. Once the students are interested in the project they need to gather information and do research before getting started and planning the project. And students might be tackling different parts of the project, or even working on different projects. Flipped learning becomes essential in this type of classroom because the teacher cannot (and definitely should not) be the holder of the knowledge. Teachers have the much bigger, much more important job of helping students process that information and make meaning out of it. That's what teaching is all about and I believe that's why classrooms and learning communities will always be an essential part of the learning process.
I can get behind this model. This makes sense to me. It's not the only tool that is being used, but it's a tool. This is a new way of looking at flipped learning for me, where the "flipping" is only part of the learning experience. That makes so much more sense, and it is a model I can actually use in my classroom. It is not about using lectures to teach. I see that now.

Please go to the actual article, because they actually have a much better, way more interesting graphic, but this is just me, putting it into my words, making it mean something to me ... and then of course sharing it with you!

Based on experiential learning cycles and McCarthy's 4MAT cycle of instruction.
It's during the LEARN phase of this model that flipped learning can make learning not only independent but also differentiated. Imagine this was a project based learning classroom. Once the students are interested in the project they need to gather information and do research before getting started and planning the project. And students might be tackling different parts of the project, or even working on different projects. Flipped learning becomes essential in this type of classroom because the teacher cannot (and definitely should not) be the holder of the knowledge. Teachers have the much bigger, much more important job of helping students process that information and make meaning out of it. That's what teaching is all about and I believe that's why classrooms and learning communities will always be an essential part of the learning process.
I can get behind this model. This makes sense to me. It's not the only tool that is being used, but it's a tool. This is a new way of looking at flipped learning for me, where the "flipping" is only part of the learning experience. That makes so much more sense, and it is a model I can actually use in my classroom. It is not about using lectures to teach. I see that now.

All icons from www.nounproject.com - hook by sergey demushkin - crane by gloria vigano
29 March 2016
Flipping my understanding of Flipped Learning
I can remember sitting in conference session listening to Jeff Utecht talk about Flipped Learning and just having my mind blown! What he was saying was so inspiring, so new, so fresh, such a great idea ... I had to try it right away!
Here is my first blog post (waaaaayyyyyyy back from 2011) about Flipped Learning:


I can see the beginning of my enlightening. I look forward to learning more about how I can use flipped learning in my classroom. Stay tuned for more mind-blowing learning ahead! I have so much more to learn!
Here is my first blog post (waaaaayyyyyyy back from 2011) about Flipped Learning:

I came home from that EARCOS conference and on Monday I was trying Flipped Learning in my classroom. Only, I had a very limited understanding of it. I didn't dive in past the amazing introduction our teachers gave us. Embarrassingly, my superficial understanding had me putting lectures online for students.
Lectures.
Me. Making video's of lectures. WHY? Why would I do that? I NEVER gave lectures! I hate giving lectures, and to top it all off, I'm TERRIBLE at giving lectures. I hope you can tell from my usage of all caps, that giving lectures has never, should never, and will never be a part of my toolbox of teaching strategies. I hate them. I hate listening to them and I hate giving them. Some people are so charismatic - and could lecture all day with people sitting on the edge of their seats. I am NOT one of those people. So it's easy to see how I got the Flipped Learning thing all wrong from the beginning.
But thankfully people, I'm here now. I'm learning. I'm not in the dark for much longer. I'm here with an incredible cohort of colleagues to learn from at EdTechTeamOnline.
I have already been so inspired in this course, mostly by Ramsey Musallam's Ted Talk on how to spark learning:
In this video he says many inspiring things. But my favorite is this:

I know this resonates with me because it's exactly how I used to think about flipped learning. I wondered what all the fuss was about ... a lecture is still a lecture! Still something I hated!
I can see the beginning of my enlightening. I look forward to learning more about how I can use flipped learning in my classroom. Stay tuned for more mind-blowing learning ahead! I have so much more to learn!
icons from www.thenounproject.com - disguise by helen tseng
Subscribe to:
Comments (Atom)